
Everyone wants to shine in their photos, but sometimes little flaws—like a double chin—can dim that sparkle. It’s a common issue that can make you feel self-conscious, especially when you notice it staring back at you in a picture. The great news? You don’t have to live with it. There are easy ways to remove a double chin from photos, transforming your images into something you’re proud to share.
A double chin can sneak into even the best shots, altering how your face looks and stealing attention from your true features. If you’ve ever wished for a quick fix, you’re in the right place. This guide is designed to empower you with simple, effective methods to erase that extra chin and boost your photo confidence.
Here’s what you’ll learn in this article:
- A beginner-friendly way to remove a double chin in Photoshop
- The top app for removing a double chin on the fly
- The best photo editing tools to smooth out that jawline effortlessly
To kick things off, picture this: a side-by-side comparison of a photo before and after editing. Those results will inspire you to try these techniques yourself and see just how achievable a flawless look can be!
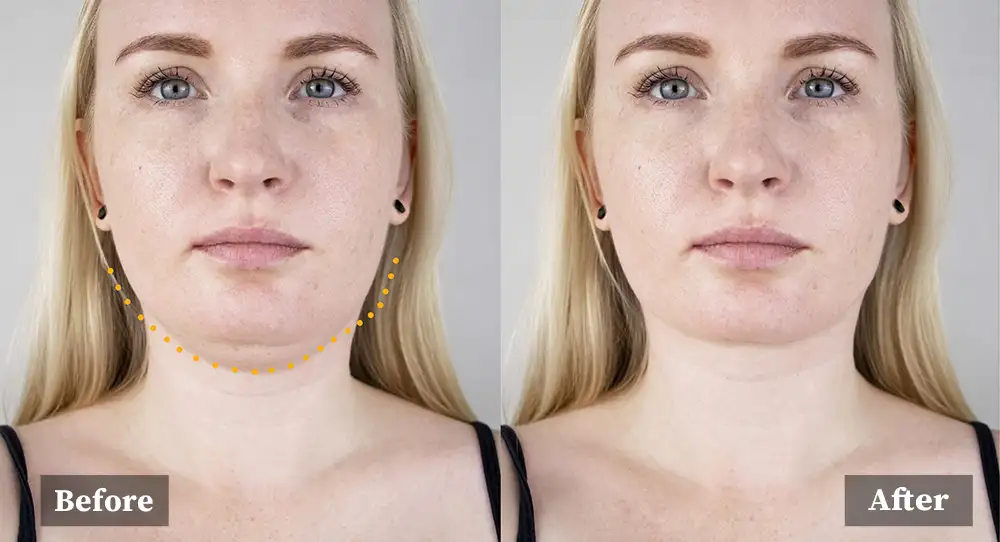
Table of Contents
Why you should edit out double chin?
Absolutely, the solution to this pesky problem is simpler than you might think. After all, no one wants to feel less than their best in photos—whether it’s a group snapshot or a stunning Instagram-worthy pose. A double chin can sneak into the frame and steal your confidence, but fortunately, there’s an easy fix.
If you’re eager to remove a double chin from photos and achieve a sleeker, more defined jawline, take a moment to explore this guide. By carefully following the steps we’ve outlined, you’ll discover how to transform your pictures with minimal effort and maximum impact.
To address this widespread concern, we’ve developed a swift and practical solution. For those short on time or simply looking for a hassle-free way to edit out a double chin, we’ve got you covered. Instead of struggling with tools yourself, you can entrust the task to us. Our team of highly skilled Photoshop editors brings years of experience to the table, ensuring your photos are polished to perfection in no time.
So, whether you’re mastering the art of photo editing on your own or opting for expert help, this article will point you toward a flawless finish. Say goodbye to double chins and hello to photos you’ll love sharing!
Double Chin Photo Editor Free Online?
If you’re on the hunt for a free online double-chin photo editor, you’re in the right place—this article is here to offer you substantial support. Finding a tool to remove a double chin from photos can feel like a game-changer, but there’s a catch. While you might stumble across a free photo editor, achieving that flawless, polished look often remains just out of reach.
On the other hand, there’s a smarter alternative worth considering: entrusting your photos to us. By simply filling out the quick form below with your name, email, and specific editing needs—then attaching your files—you’ll set the process in motion. What’s more, it’s hassle-free and tailored to your vision.
Then, in just a few hours, our expert team will work their magic and deliver a watermarked preview straight to your inbox. This way, you can see the stunning results for yourself before committing. Why settle for less when you can have professional-quality edits that make your photos truly shine? Take the leap and let us help you perfect your pictures today!
Contact Us to Remove Double Chin
How to Remove Double Chin in Photoshop
Removing the double chin in Photoshop would be quite easy for you if you followed up on these steps with focus.
Step #1: Open the photo in photoshop and the first thing is to define the jaw. You can do this by making a mask or using the pen tool.
I would recommend using the pen tool to select the jaw sharply.
Step #2: Select the pen tool and start defining the jaw. Just from the above of the fatlike area.
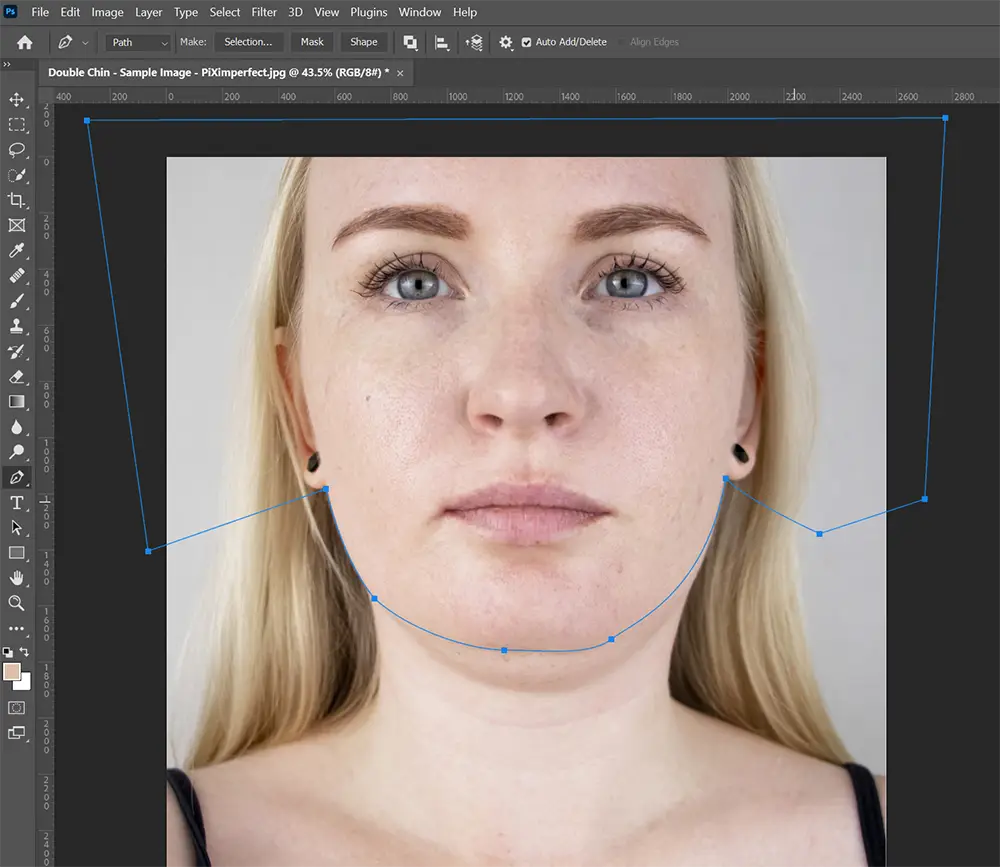
Remember you are the cosmetic surgeon right here so you need to define how the jaw is going to be without the double chin. The risk is on you.
Once you have made the selection, do not forget to save the path.
Make sure to rename all layers like me to not messed up things.
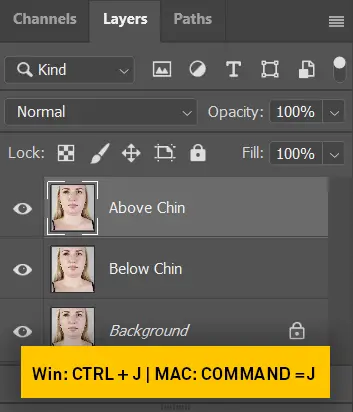
Step #3: Make two copies of the background layer by pressing [CTRL+J] or [Command+J] twice. After that, rename the top layer “above chin” and the bottom layer “below chin.”
Just like cosmetic surgery, we have to push in the below chin to hide the fat under the chin.

Step #4: With the selection path active, right-click on the path and make a selection. Second, go to the above chin layer and create a mask.
Ensure the area above the chin is still visible and the area below is hidden.
Step #5: Next, select the “below chin” layer to push it in. Before doing anything, let’s convert this layer into a smart filter so that we can change the values of any filter later.
To do that, go to “filters” then click on “Convert for smart filter”.
Now we are going to push the below-chin layer a little bit inside, and before we get into it, duplicate the above-chin layer.
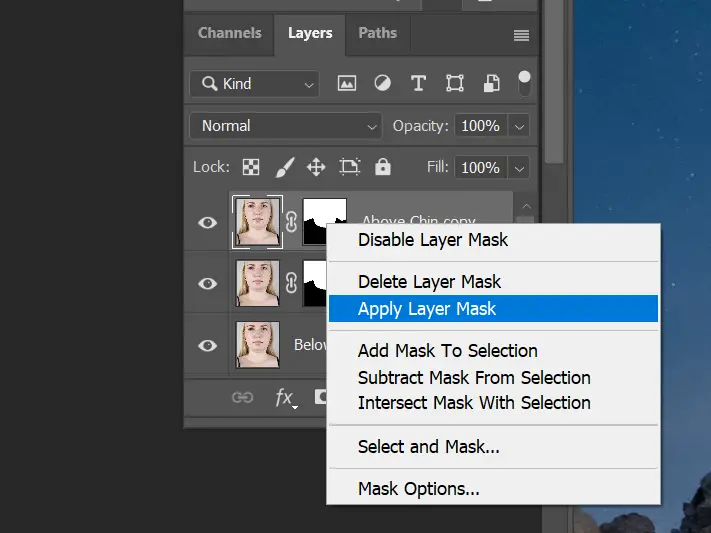
When using Liquify, the upper chin layer’s mask isn’t factored in. To fix this, apply the mask by clicking on it and selecting “Apply Layer Mask.” This is why we keep a copy of the mask for future edits.
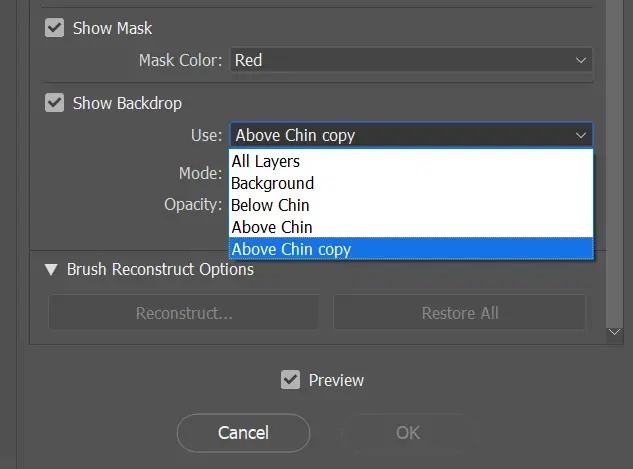
Step #6: Select the below chin layer and go to the liquify tool. Scroll down the slider and make sure “show backdrop” is checked.
Now use the toggle to select the “above chin layer copy” layer so that you can see the effect in real-time.
Step #7: Select the forward warp tool with lower pressure and start pushing the chin upward, but slowly and gradually. Make sure the hair is not affected.
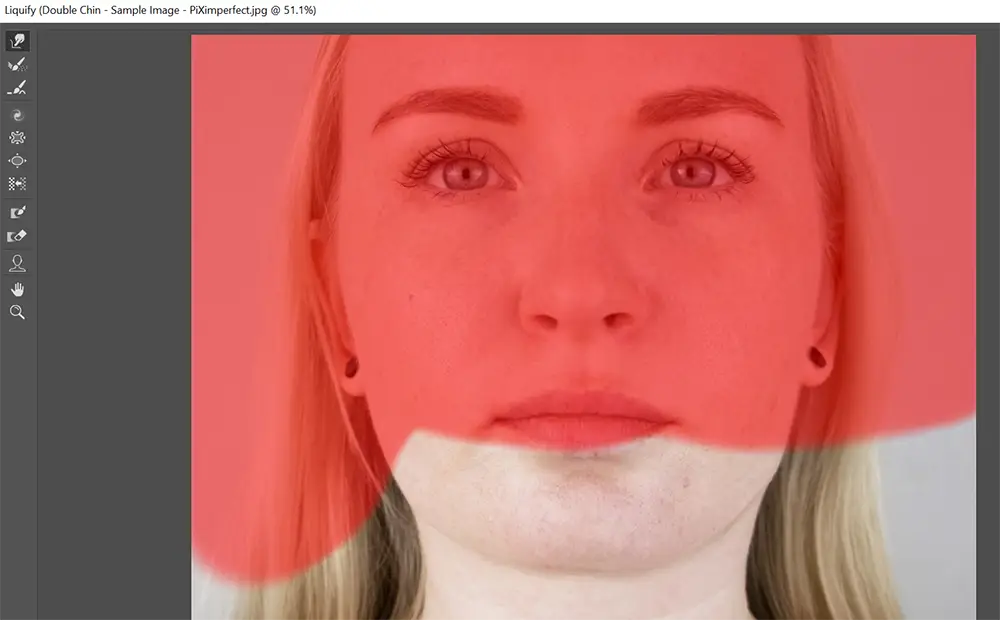
To play safe, utilize the freeze mask tool to protect specific areas.
Be cautious not to overuse it, maintaining a natural look by not pushing the chin too much. Lastly, click “OK” to save.
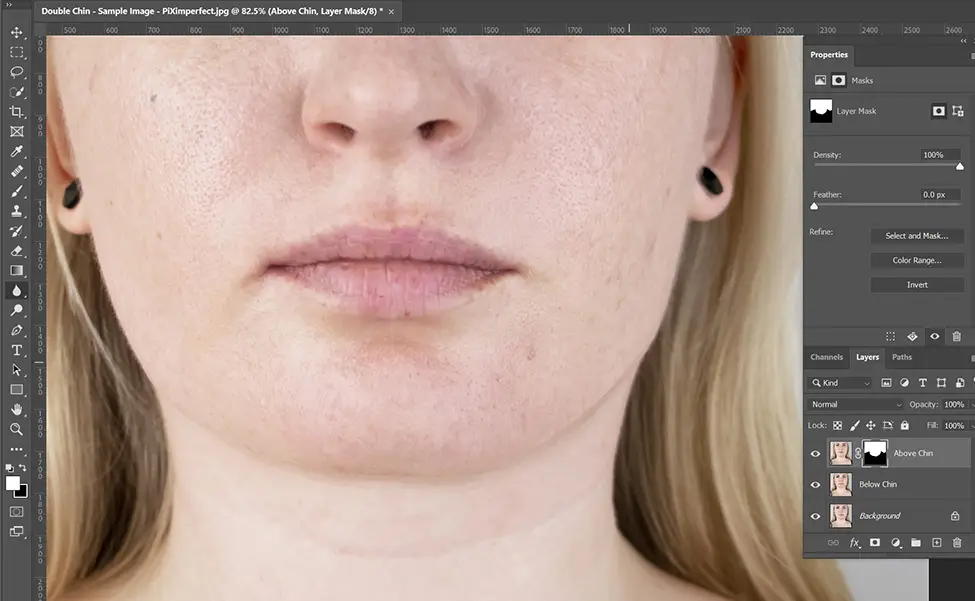
Step #8: Now it’s time to soften the edges, but we have already applied the layer mask.
But that was just for liquifying so we could delete that layer. Now we can deal with the mask.
So just select the mask and zoom in to the edges. Select the “blur tool” and keep the “flow” to somewhere around 3-4%.
Now, start painting on the edges that you want to soften.
Next, you can also add some shadows under the above chin layer to make it look more natural.
That’s it!
We are done with the tutorial on removing double chins in Photoshop.
What app removes double chin?
There are numerous apps available for removing double chins from photos, making it challenging to choose the best one, as they all compete fiercely.
Ultimately, the ideal app is the one that you find easiest to use. In my experience, PicsArt stands out for its extensive range of editing features, giving users significant control over their photo enhancements.
From an editor’s perspective, it ranks among the top photo editing apps on the market today.
How to edit out a double chin on iPhone?
Hundreds of people search for how to get rid of a double chin in pictures. Especially on the iPhone.
So, we are going to use the PicsArt app to edit out a double chin on an iPhone. Stay tuned and follow the steps.
How to remove double chin in PicsArt?
Watch this video to remove double chin in mobile. Now let’s head towards it.
If you are an Android user and want to edit out the double chin, then this part would be beneficial for you.
There are two methods for removing a double
chin in PicsArt:
1. Using an AI tool
2. Using the Draw tool
The first method is the easiest one
but this feature is only available in the “Gold” version of PicsArt. You have
to buy the premium version first.
Also, you can try the 7-days of the free trial of PicsArt.
Let’s start with this method first.
Removing double chin in PicsArt - 1st Method
Step #1: Open the image in PicsArt and tap on the “retouch”
icon. It will open a retouch panel.
Step #2: From there, select the face and then the “chin” icon.
Bring down the slider according to your desired level.
Step #3: Now, select the third option from the left, next to
the “Chin” icon, and bring the slider down somewhere around 20%. It will shrink
the size throat which will help to look the chin slimmer.
Step #4: Save the image by hitting the tick icon in the
upper-right corner.
That’s it. These are the process of the
first method of removing the double chin in PicsArt.
Move toward the second process. This method is a little harder than the first one. But, the second one does not require a premium subscription.
Let’s dive into the tutorial.
Removing double chin in PicsArt - 2nd Method
Step #1: Open the image in PicsArt and go to the tools menu
then select “stretch tool”.
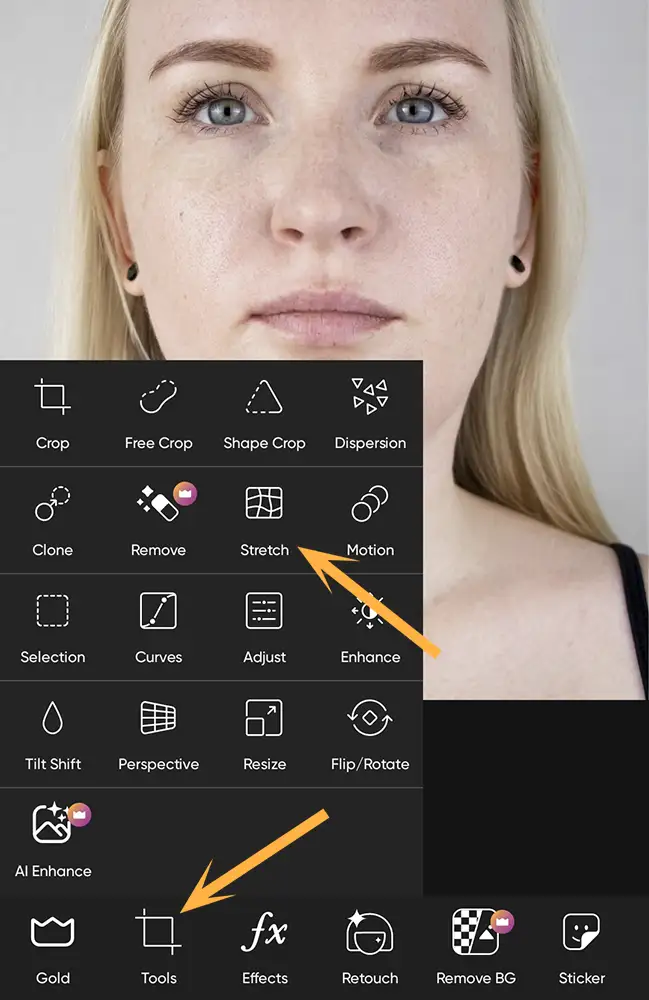
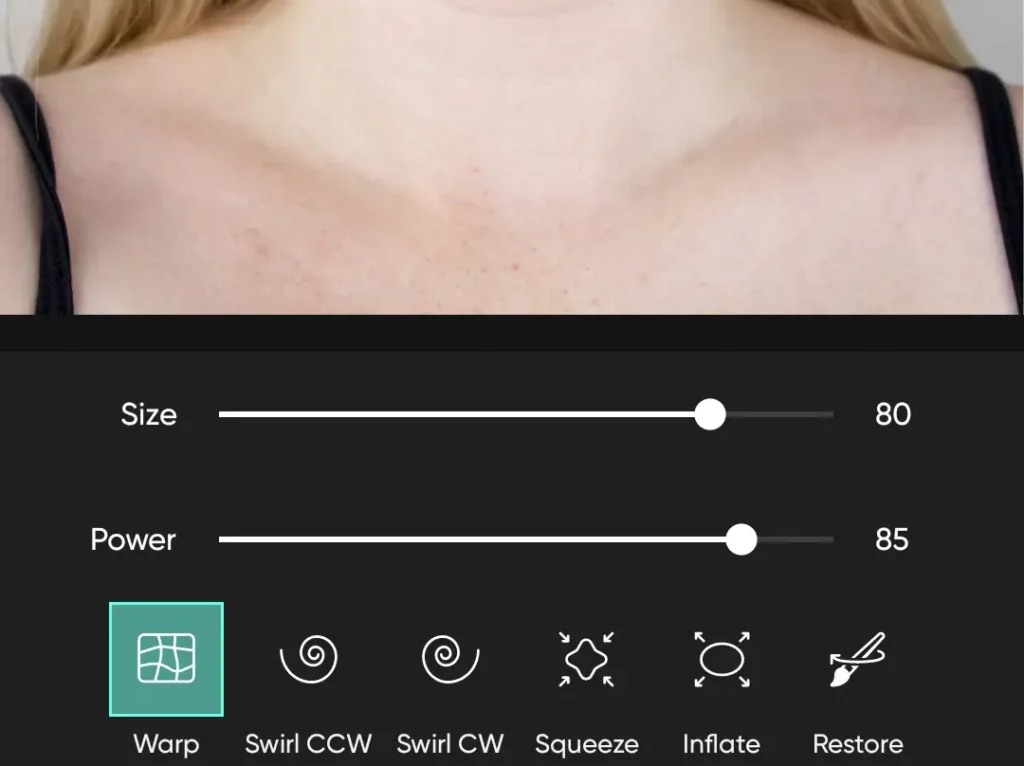
Step #2: Set the “Power” to somewhere around 85% and the size
of the brush to 80%.
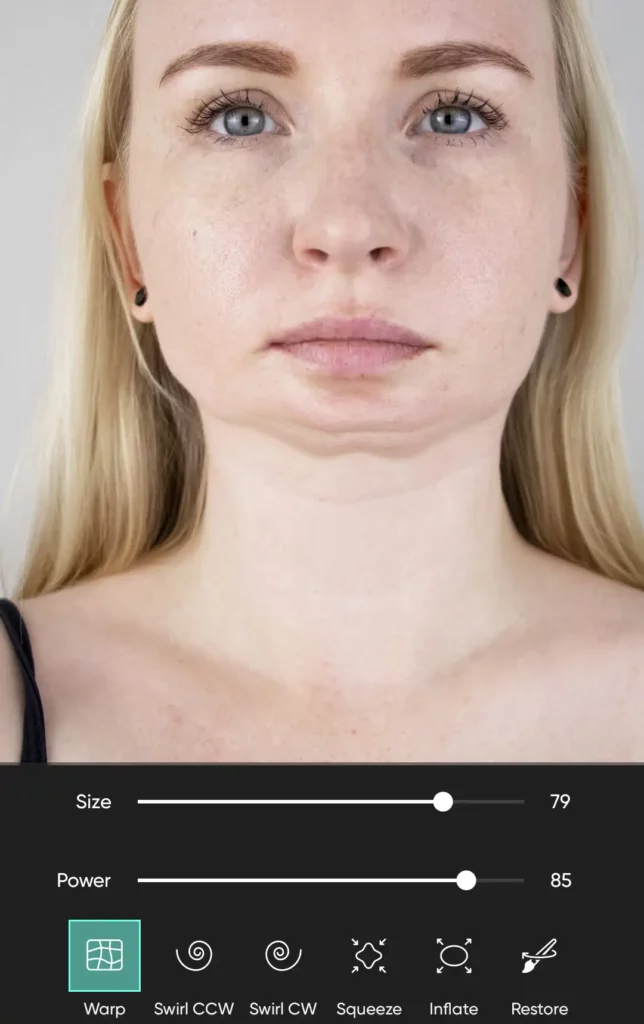
Step
#3: Zoom
in to the picture and start smudging the chin upward. Ensure you don’t do too
much. Hit the save button once it’s done.
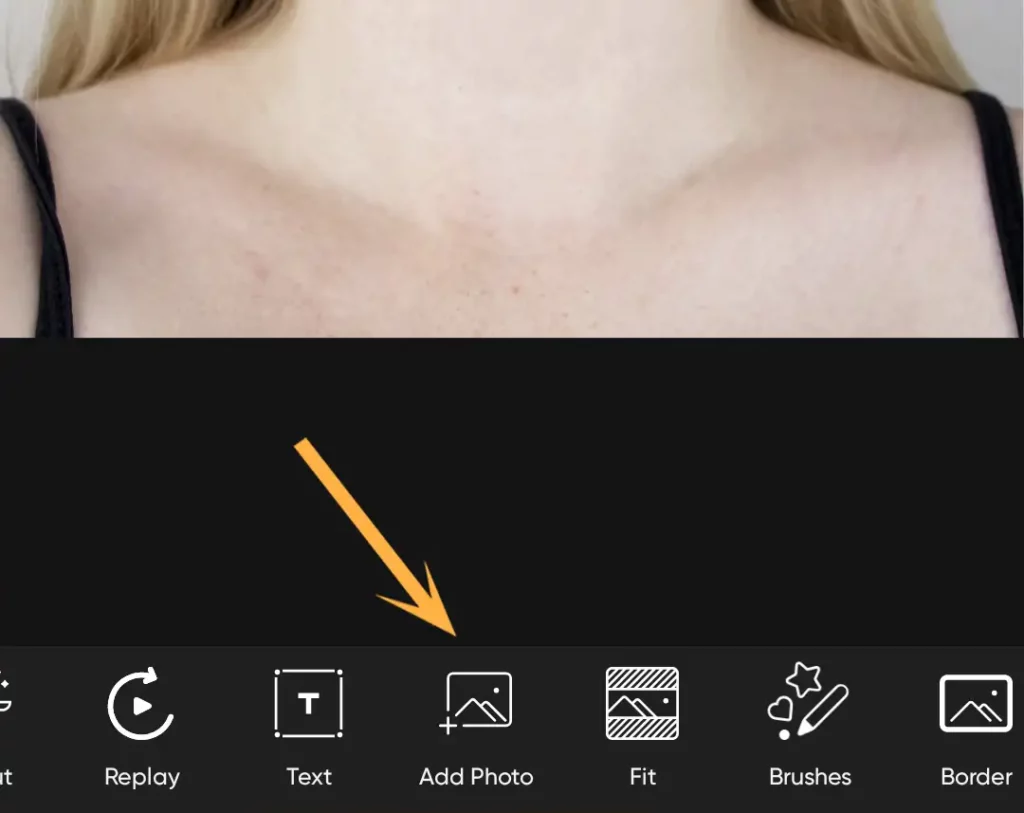
Step #4: Now, add the same image again above the current image.
Simply do it by just tapping on “Add photo”.
Step #5: After adding the image, go to the eraser tool to
remove the chin. Now, set the hardness to 90% and the size accordingly.
Step #6: Zoom in to the image and start erasing the chin
slowly and gradually. Hit the right tick to save the changes.

Step #7: After that, let’s add some shadows to the image to
look it more natural. Go to the “tools” menu and select “adjust” then decrease
the brightness.
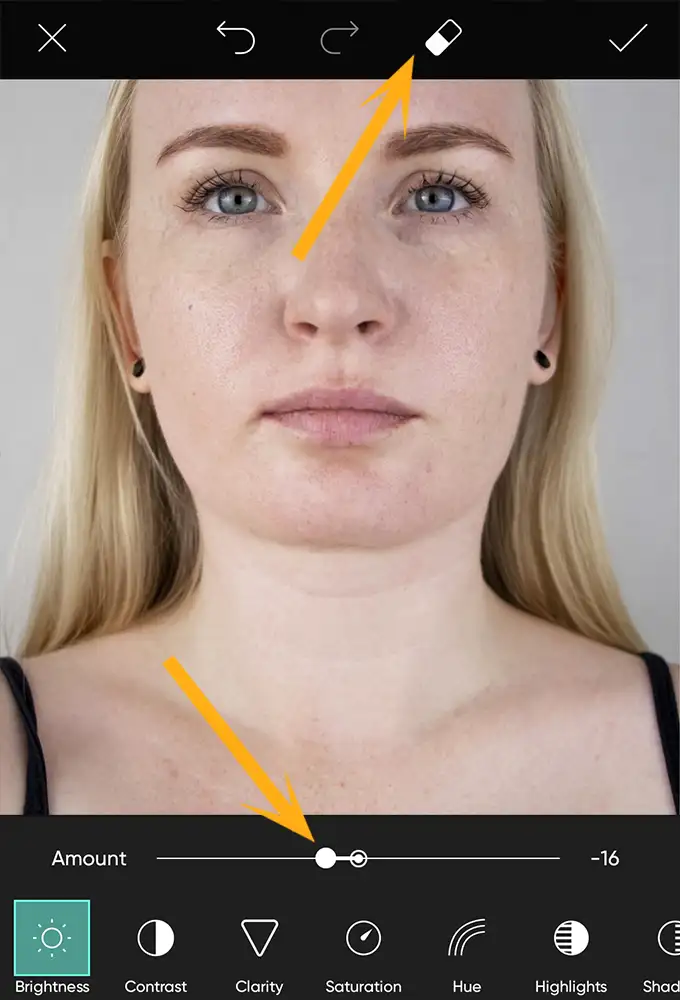
In my case, I will decrease it to -16
then go to the eraser and invert the changes. Now select the “restore” pencil and
add the shadows to just under the chin.
Once it’s done, save the image to the
gallery.
Boom, we have covered another method also.
Remove the double chin using Photoshop generative fill A.I.
This might be the easiest step in the entire tutorial!
1. Grab the Lasso Tool. We’ll use this tool to select the area around the chin.
2. Make a Clean Selection: Draw a selection around the chin, leaving a small buffer outside the edge for the best outcome.
3. Right-click and choose “Generative Fill”: After you’ve made your selection, right-click anywhere within it and choose “Generative Fill” from the menu that appears.
4. Leave the Prompt Empty (Optional): The “Prompt” area can be left blank. If you’d like, you can simply type “chin” there.
5. Click “Generate” and see the magic happen: Hit the “Generate” button and wait a few seconds. In most cases, you’ll get a great result on the first try. However, you can always regenerate if you’re not quite satisfied.
Remove double chin from photo online for free?
There are no ways to remove the
double in the photo for free without getting the imperfections.
By following the above steps, you can
do it for free on your own, but it might be a hectic process for you if you are
a beginner.
For the people like you, we have a
solution to solve your problems by providing a double chin removal service.
You will get a great user experience
by hiring us to edit your photos.
Prevent double chin appearance in pictures
Here are a few expert-suggested tips to prevent double chin while taking the photos.
Mind Your Posture: Maintaining top posture is vital to avoid accentuating a double chin. Stand up straight, together with your shoulders again, and your chin barely lifted. By attractively defining your middle and extending your neck, you create a streamlined look that minimizes the danger of a double chin revealing itself.
Find Your Best Angle: Angles can be your great friends in relation to decreasing the appearance of a double chin in photos. You need to try to tilt your head in a way that seems proper. Avoid facing the digital camera head-on, as this can accentuate the chin location. Instead, flip your face barely to at least one side, elongating your neck and developing a more defined jawline.
Lower the Camera: When someone takes a picture from a higher vantage point, it is able to make the double chin more apparent. To counteract this, ask the photographer to decrease the digicam to eye level or slightly beneath. This approach helps create a extra flattering angle and reduces the visibility of any more pores and skin below the chin.
Chin Positioning: Proper chin positioning could make a real difference in pictures. Extend your neck forward a bit and push your chin ever so slightly down. This easy adjustment allows you to outline the jawline and limit any undesirable fullness beneath the chin. Remember to keep it herbal and comfortable, as forced poses can frequently appear stiff or unnatural.
You should try these tips on your next shot.
Conclusion: Achieve Picture-Perfect Results
In this tutorial, we have learned the process of removing double chins in Photoshop & mobile apps.
Just follow these steps and give them some practice. Surely you will get perfect results with time.
You can also hire us to remove the double chin from photos for you. Also, we provide a demo. So don’t wait any further, and get a free demo.


